Setting Up the Godox TT350 Flash
Do you own a Godox TT350? Let’s set it up! Keep reading to learn how.
Even though I love my TT685 flashes, and the usual recommendation is to have all the power you can, sometimes you need just a tiny bit of light added to your image. This is especially true when shooting at dusk or at night, and the Godox TT350 has been perfect for those situations.
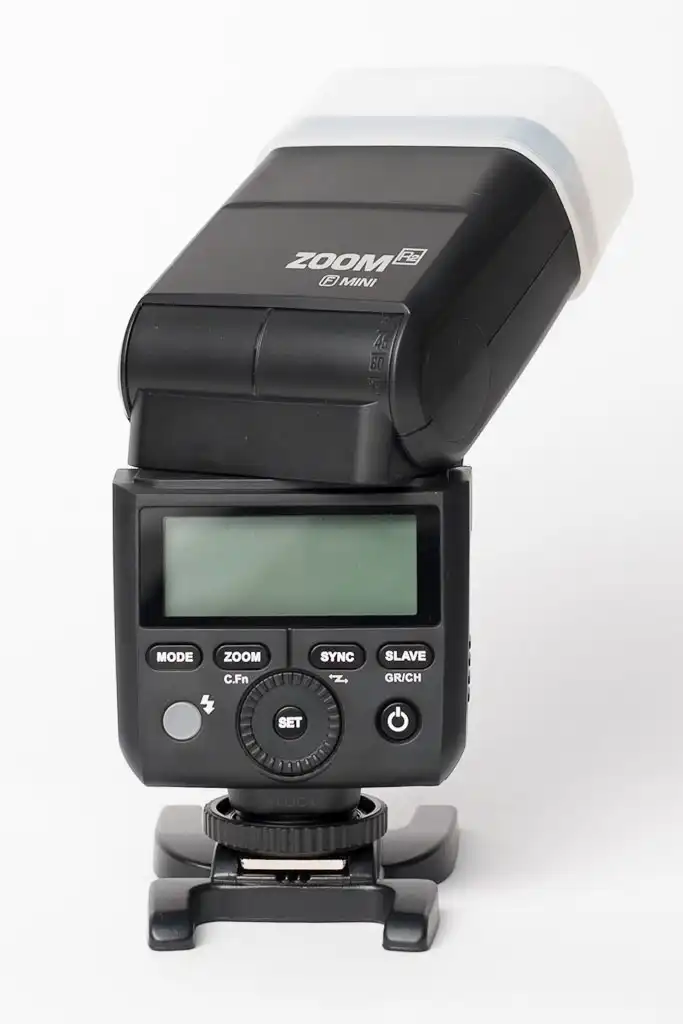
The TT350 is Godox’ smallest, AA batteries-based, hot shoe flash. It has a guide number of 35m at ISO 100 and 100mm zoom (equivalent), so it’s comparable to Canon’s 320EX or Sony’s HVL-F43RM. As it happens with all current Godox flashes, it has an integrated transceiver so it can control other flashes or it can be controlled remotely through Godox’s proprietary radio frequency system. It’s available for Canon, Sony, Nikon, Fujifilm, Micro 4/3 and Pentax cameras.
Let’s start the setup with something simple.
Batteries and Power
The battery compartment is pretty straightforward, except it only holds two AA batteries, which gives you a big hint about its power output (spoiler: it’s not super powerful, but it’s great).
After you put your batteries in, you slide the door closed and you’re good to go. Look at the back of the flash and there is no power switch but a power button, which you need to hold in order to turn the flash on, and is to the right and beneath the screen.
Tilt and Swivel
The TT350’s head can tilt up 90 degrees and down 7 degrees. In order to do it you only push the head gently in the direction you need to point to. Unlike brand name flashes, it doesn’t have a position lock so you’re free to move it without problems, but it has predefined stops/markers at the 45 and 60 degree positions. The head can also swivel left 90 degrees and right 180 degrees.
This degree of movement is exactly what I expected and it’s the same as brand name flashes.
TTL
When you first turn the flash on it is in TTL mode. It means that the flash is ready to fire and set its power automatically, based on the information sent by the camera. This only works if the flash model is compatible with your camera. If your flashes are marked for, let’s say Canon, and you have a Nikon camera, TTL will not work.
When the flash is in TTL mode you can set the flash exposure compensation, so that it fires with more or less power than the normal calculations. You can do this by pressing the SET button and, turning the wheel to the right (clockwise) will increase the compensation, while turning it to the left (counter clockwise) will decrease the compensation between -3 and +3 stops, with ⅓ stop increments.
Manual
Even though TTL is very useful in situations with constantly changing lights, it’s also hard to debug in case things don’t work. That’s why so many people recommend shooting with flash in manual mode.
Switching the TT350 to manual mode is pretty easy. Just press the Mode button once and the screen now displays an M at the top and the current power setting at the left of the screen, in the form of a fraction, so that 1/1 is full power.
To change the power setting you just turn the wheel. Turning to the right (clockwise), decreases the power, while turning to the left (counter clockwise) increases the power. Every click of the wheel is ⅓ of a stop, increment or decrement.
The flash can be zoomed to the desired coverage, and it’s pretty simple to change. Press the Zoom button once and then turn the wheel. Turning it to the right zooms the flash in, decreasing coverage. Turning the wheel to the left zooms the flash out, increasing the coverage. If you turn the wheel all the way to the left you’ll see the AU option, which allows the flash to set the zoom automatically, based on the lens on the camera. This is one of those compatible camera-only functions.
Off-Camera
If you plan to use the TT350 for off-camera flash, you have one universal way to do it and a Godox-only way.
Optical Slave
The universal way to trigger the off-camera flash is using the Optical Slave mode, also known as Servo mode. You can select this pressing the SLAVE button once. You’ll now see an “S1” on the flash screen.
In this mode the flash will wait and fire in manual mode when it “sees” another flash firing. You need to make sure the light sensor is clear and within line-of-sight of the triggering flash. If the flash you’re using as the trigger is in “red-eye reduction” mode, you need to set the TT350 to wait until the second firing of the trigger flash. You can do this pressing the SLAVE button again, so you now see an “S2” on the flash screen.
Radio – Master
In order to set the TT350 as a Master, controlling other flashes through radio signals, you need to press and hold the SYNC button, until you see a radio antenna icon on the lower right corner of the screen. Turn the wheel to the left one click and you’ll see an M icon next to the antenna icon. You’ll also see the letter [M] next to the power indicator and it refers to the mode and power setting of the Master flash.
In order to select a group, press the SLAVE button repeatedly until the desired group is shown. It will be between brackets, next to the power setting. You can then press the MODE button to switch that group between Off, TTL and Manual Modes. If you’re in Manual mode, turning the wheel will change the power setting of the selected group. If you’re in TTL mode, it changes its flash exposure compensation.
Pressing and holding the SLAVE button allows you to change the channel used to communicate with the slave units.
Radio – Slave
Setting the TT350 as a Slave unit is pretty simple, you only need to press and hold the SYNC button again, so you’ll see a radio antenna icon on the screen, turn the wheel right one click and you’ll also see an S icon next to the antenna icon.
In Slave mode you can only set the channel, by pressing and holding the SLAVE button and rotating the wheel; and you can also set the zoom, by pressing the Zoom button. In order to assign the flash to a different group, press the SLAVE button repeatedly. It will cycle between groups A, B or C.
The Mode and Power setting will come from a Master unit or a dedicated transmitter.
As I mentioned in the Godox TT685, there’s one important consideration when using radio frequency systems: they are, usually, not compatible with each other. If you have Godox flashes, they can only be triggered with a Godox Master, but not a Yongnuo or Nissin or Canon transmitter.
Summary
As you can see, the Godox TT350 is a very capable flash. It is available for many camera brands like Canon, Sony, Nikon, Fujifilm, Micro 4/3 and Pentax . The TT350 is very reliable and well made, and is a great alternative to brand name flash units. It is also part of a robust flash system from Godox, which includes both speedlights and flash heads.
I really hope you found this post interesting, informative but also entertaining. If that is the case, please leave a comment below and share this post with your friends! But most of all, please remember to Stay Safe, Keep Learning and Keep Creating.
DISCLAIMER: Links included in this post might be affiliate links. If you purchase a product or service with the links that I provide I may receive a small commission at no additional charge to you. Thank you for supporting this blog so I can continue to provide you with free content every week!